Olive Drab Floater Project
For more information, contact Secret Weapon Lures
In the winter of 1996, I decided to invest some time and money into fitting out my 14 foot Bass Tracker jon boat. That is an ideal model for decking due to it's wide beam 60 inches across the gunnels at the stern. I have fished out of many jon boats with partial or full decks, and I wanted to come up with a design that improved on storage space, ease of access, and usable deck space. Heres what I came up with.
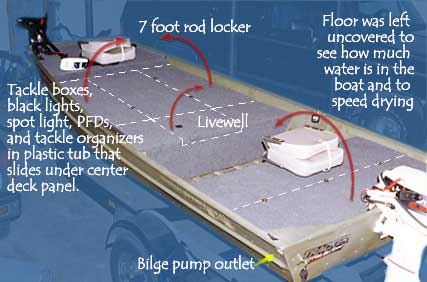
In all, five panels of plywood were used. The Bass Tracker has a center bench seat (with live well) and another in the stern. There is also a small front deck in the bow. I built a framework for three plywood panels between the front deck and center bench. Two other wood panels covered the stern bench and rear storage compartment.
|
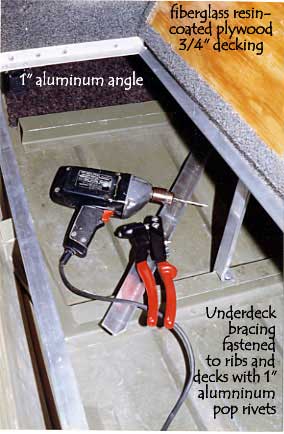
In an earlier jon boat conversion project, I had used 2 x 4 bracing, but I thought it added too much weight to the boat while reducing storage space. For this project, I chose to use 1-inch aluminum bracing. All aluminum-to-aluminum attachments were made using aluminum pop rivets. For steel-to-aluminum connections, I used stainless steel bolts or screws.
This set-up enabled me to create a 6-1/2 foot long rod locker on the starboard side, with rod tips extending under the bow deck.
|
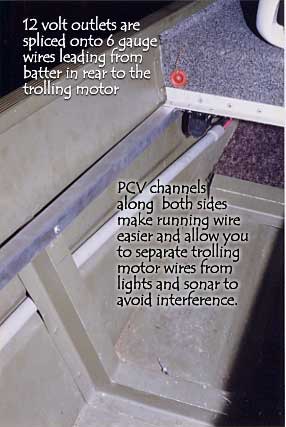
I ran trolling motor and lights wiring up the port channel and sonar wiring up the starboard channel to avoid interference. Grey electric PVC tubing was a snug fit, but it ended up looking good and keeps the wires protected and out of sight.
The red dot you see and the black receptacle underneath that are 12-volt accessory outlets for my spot light and black light. A also have a receptacle at the stern so I can run two black lights when fishing with a partner at night.
|
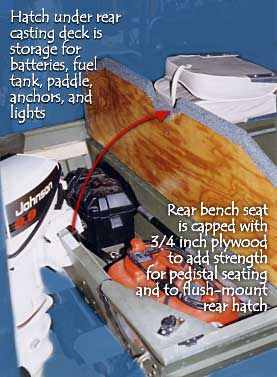 The rear deck overhangs the front of the stern bench seat just slightly, and stainless steel hinges attach the rear hatch. Aluminum bracing across the transom support the hatch on the back edge.
|
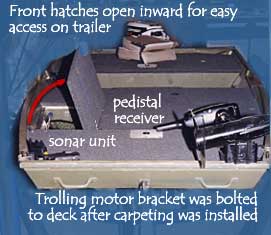 One of the best features of this design is ease of access to all the under-deck storage while the boat is trailered. Also, this design makes it less likely that I'll lose rods and reels over the gunnel when I open the hatch. When afloat, I just reach in from the center bench or fold the hatch flat on the center panel, get what I need, and then close it back.
|
Okay . . . what did all this end up costing? Unfortunately, it wasn't free. Even though I had a few parts and materials lying around already, and I bought others at discount, I still had to shell out some money for this project. Below is a chart with actual costs (or estimated cost for stuff I already had on hand).
| Parts
| Cost
|
| Big foot trolling motor switches (2)
| $21
|
| Auxiliary power sockets (2)
| $6
|
| 40 amp circuit breaker for trolling motor
| $7
|
| 12-volt trolling motor connector - male
| $7
|
| 12-volt trolling motor connector with cap - female
| $8
|
| 6-amp multi-strand electric line; 16 red, 16 black
| $10
|
| Stainless steel bolts, nuts, and washers
| $4
|
| 3 piece pedestal set (swivel and 11" post) (2)
| $56
|
| Fold-down seats (2)
| $20
|
| Marine plywood, 1 sheet 4 x 8, 1/2", salt-treated
| $25
|
| Fiberglass resin (1 gal.) and hhardener
| $15
|
| Aluminum braces & supports for decking
| $50
|
| Bilge pump
| $16
|
| Hose for bilge pump
| $3
|
| Aerator kit for livewell
| $13
|
| Bow and stern lights, sockets, wiring
| $41
|
| Hatch kit (hinges, lift ring) (2)
| $26
|
| stainless steel fastener kits (2)
| $22
|
| Pole storage clips for bow and stern lights (4)
| $10
|
| Boat carpet kit from BPS
| $100
|
| Total
| $401
|
Trolling Motor Mount
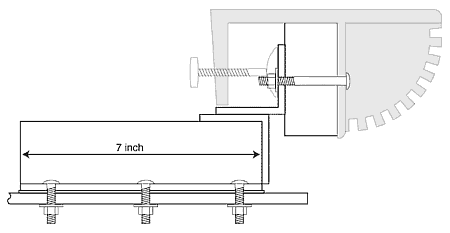
The Bass Tracker jon boat has a two inch high rail on the bow deck. I decided to use a stern-mount 36-pound thrust trolling motor and attach it to the front to free up casting deck space.
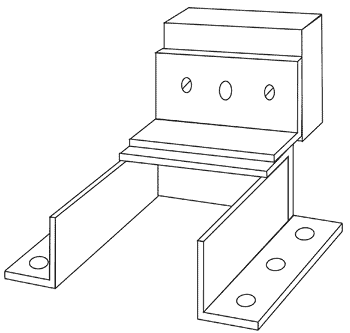
The trolling motor brace I fabricated is made of scrap steel bracing, a few stainless steel connectors (for attaching it to the deck), and three steel bolts (to attach a short section of pressure-treated 2 x 4), which I found rummaging around in the workshop. A buddy welded them up for me, and I bolted it on the deck after laying the carpet. Lock washers seem to have done the trick I've used this brace for four years now and its still as sturdy as the day I mounted it.
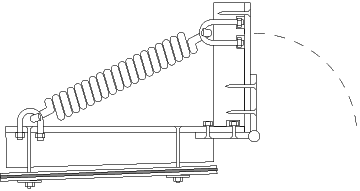
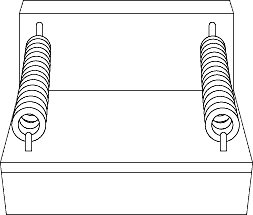
I also designed and built a spring-loaded version from spare parts in my workshop that had the added advantage of swiveling when I ran my trolling motor into stumps. I never got around to mounting it on the boat or trying it out, but in the shop it performed well. Maybe one of these days . . . .
Links of Interest for Boat Conversions
Glen-L marine designs: Wood & Plywood Information
|